Build & Deploy a URL Verification Application with FastAPI and GoogleColab
Learn how to develop a full-stack Machine Learning application using FastAPI, HTML, CSS, and JS, and deploy it to Google Colaboratory!
Previously, I heavily relied on Heroku's free services for serving ML-based backend applications, whether for hackathons or personal projects. But the Heroku team decided to discontinue their free services leaving me in a pinch. I was searching for an alternative that could fill the void left by Heroku's departure, and now, I have found a promising solution, which I'll be sharing through this article. 😉

I am aware that there are several alternative solutions available, such as Render; however, they come with certain limitations. In my search for a simpler and more straightforward solution, I discovered that using Colab allows for the deployment of not only the ML model but also the APIs and the front end. In this article, I will share an approach through which you can develop and deploy your machine learning applications using Google Colab, all free of charge! 💸
Without any further ado, let's get started! 😃
❄️About Application
In today's digital landscape, where information is abundant and easily accessible, verifying the authenticity of URLs is of utmost importance. With the rise of phishing attacks and malicious websites, it becomes crucial to develop robust tools that can determine whether a given URL is legitimate or fake.
Through this article, we will explore how to build a full-stack URL verification application using FastAPI as the backend framework and deploy it using Colab.
🧍Prerequisites
As a basic prerequisite, you need to have some basic understanding of the following,
Google Colab
Frontend and Backend Systems
Basics of Python and any framework (Django/ Flask/ FastAPI)
HTML, CSS, JS
Machine Learning
Having a grasp of these concepts and technologies will greatly contribute to your ability to effectively utilize Colab for ML backend deployment.
🛠️Approach
You can access the full code through, the GitHub link.
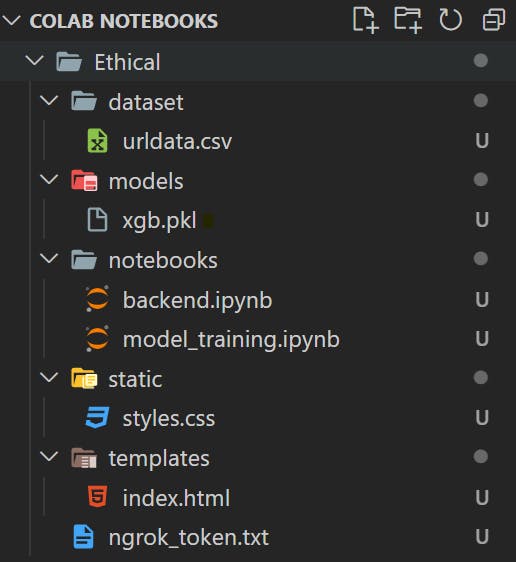
As the code will be running on Colab, we need to first store all the files in our google drive, to maintain persistence.
Go to Google Drive and create a directory /Colab Notebooks/Ethical/, this is the directory where all our files will be stored.
The final Directory structure should look like the following,

🚶Setting up Ngrok
Ngrok is the fastest way to host and secure your applications and services on the internet. We will be using Ngrok to host our application over the Internet. For that we need a Ngrok token, you can create it by following the below steps,
Generate Ngrok Token via, Ngrok link.
Create a file 'ngrok_token.txt' inside the
Ethical/folder and paste the Ngrok token, in the file so that it can later be imported into the code.
🚶Training the ML model
We will be following an approach similar to the one developed by Shreya Gopal, with some minor updates. If you are interested in a detailed understanding of the code, you can visit the GitHub repository
Steps
Dataset Preparation
Download the dataset from the following link: dataset link. It contains 10,000 records, evenly distributed between legitimate and phishing URLs.
Place the dataset in the directory
/Colab Notebooks/Ethical/notebooksand name it 'urldata.csv'.
Colab File For Model Training
Create a folder named
notebooksinside theEthical/directory (/Colab Notebooks/Ethical/notebooks).Inside the
notebooksfolder, create a Colab file named 'model_training.ipynb' following the code provided in the file model_training.ipynb.This file prepares the dataset and trains various models based on it. We will select the model with the highest accuracy for our application.
By following these steps, you will be able to set up the necessary dataset and train the models for your application.
🚶Developing UI
The application's user interface (UI) serves as the primary point of interaction with the user. It displays a basic text layout comprising an input textarea where users can enter their messages. To maintain simplicity, the UI is developed using basic HTML and CSS.
To add the UI to the application, follow these steps:
Create two directories, 'static' and 'templates,' inside the 'Ethical' directory. The paths would be
/Colab Notebooks/Ethical/static/and/Colab Notebooks/Ethical/templates/respectively.Within the 'static' directory, create a new file named 'style.css.' This file will contain all the CSS code required for styling the application. You can refer to the code provided in the 'styles.css' file.
Similarly, create a file named 'index.html' inside the 'templates' directory. This file will handle the HTML and JavaScript aspects of the program. You can refer to the code provided in the 'index.html' file.
Notice the code here,
function sendData() {
  const formData = new FormData(document.querySelector('form'));
  const text = formData.get('text');
  const resultElement = document.querySelector('.result');
  resultElement.innerHTML = 'loading...';
  fetch('/predict', {
    method: 'POST',
    headers: {
      'Content-Type': 'application/json'
    },
    body: JSON.stringify({ text })
  })
    .then(response => response.json())
    .then(data => {
      // Update the HTML content with the result received from the backend
      ...
    })
    .catch(error => {
      console.error(error)
      resultElement.innerHTML = 'somthing went wrong.. please try again later';
  });
}
The sendData() function defined above handles form submission, by making a POST request sending the form data to the backend server for prediction, and updating the HTML content with the result received from the server.
🚶Developing Backend
The backend will serve as the foundation for creating an API route that will retrieve user input data from the front-end, extract the URLs, and utilize a machine learning model to determine their legitimacy or potential phishing nature.
To create and deploy your backend, you can follow the steps below:
Create a Colab file named 'backend.ipynb' within the '/Colab Notebooks/Ethical/notebooks/' directory. This file will serve as our backend API, and you can refer to the code provided in the 'backend.ipynb' file.
This file will create an API and host it over the internet using Ngrok, the API here is powered by FastAPI.
Notice the code here,
app = FastAPI()

app.add_middleware(
    CORSMiddleware,
    allow_origins=["*"],
    allow_credentials=True,
    allow_methods=["*"],
    allow_headers=["*"],
)

app.mount("/static", StaticFiles(directory=ROOT_PATH+"/static"), name="static")
templates = Jinja2Templates(directory=ROOT_PATH+"/templates")
model = load_model('xgb.pkl')

@app.get("/", response_class=HTMLResponse)
async def home(request: Request):
    return templates.TemplateResponse("index.html", {"request": request})

@app.post("/predict")
@app.post("/predict")
def predict(request: Request, data: dict):
  try:
    # extract and check the legitimate and fake URLs
    ...
  except Exception as e:
    return {'message': 'Server Error' + str(e)}

ngrok_tunnel = ngrok.connect(5000)
print('Public URL:', ngrok_tunnel.public_url)
nest_asyncio.apply()
uvicorn.run(app, port=5000)
The above code snippet showcases the basic structure of a FastAPI application, including the setup of CORS middleware, handling static files and templates, loading a pre-trained model, defining routes for rendering templates and handling prediction requests.
There are 2 routes,
Base Route ('/') is a GET route that renders the
index.htmltemplate usingtemplates.TemplateResponse, passing the current request as a context variable, andPredict Route ('/predict') handles a POST request that expects a JSON payload containing a
textfield. It extracts URLs from the text, performs feature extraction on each URL, and uses the pre-trained model to predict whether the URLs are legitimate or fraudulent.
app.mount("/static", StaticFiles(directory=ROOT_PATH+"/static"), name="static")
This code mounts the /static route in FastAPI and serves static files from the specified directory (ROOT_PATH+"/static") inside google drive, allowing access to files such as CSS, JavaScript, and images.
templates = Jinja2Templates(directory=ROOT_PATH+"/templates")
This code sets up the Jinja2 templating engine in FastAPI, enabling the rendering of dynamic HTML templates located in the specified directory (ROOT_PATH+"/templates") inside google drive, facilitating the injection of variables and dynamic content into the HTML before sending it to the client.
Now that we have the code ready, it's finally time to deploy the application! 🤩
🏃Deploying the Application
To deploy the application, follow these steps:
Create a folder named "models" inside the
/Colab Notebooks/Ethical/directory. This folder will store all the models generated when running the 'model_training.ipynb' notebook.Open the 'model_training.ipynb' notebook in Google Colaboratory. Connect the notebook to Google Drive by uncommenting and executing the following cell provided in the file. (note: change the runtime of the notebook to GPU for good efficiency)

Once the notebook is connected to Google Drive, run all the cells. After a few minutes, when all the cells have finished executing, check the
/Colab Notebooks/Ethical/modelsfolder created in Step 1. It will contain the trained models in the form of .pkl files.Now, open the 'backend.ipynb' file. Similar to step 2, change the runtime to GPU and connect this notebook to Google Drive. Once connected, execute all the cells one by one.
You will notice that the API cell runs continuously, printing a link similar to "3dcd-34-86-242-182.ngrok-free.app". This indicates that your application is up and running.
By following these steps, you have successfully deployed your application using Colab, enabling you to continue serving your ML-based backend without the need for Heroku's free services.
🤗Conclusion
In this article, we explored the process of building a full-stack URL verification application using FastAPI as the backend framework and deploying it using Colab.
We discussed the advantages of Colab, including its free access to a Jupyter Notebook environment and GPU/TPU resources. This makes it an attractive choice for deploying ML-based applications without the burden of significant costs.
We also provided a step-by-step guide to deploying an application using Colab. From creating a dedicated folder for models to connecting the notebooks to Google Drive, running the necessary cells, and finally having the application up and running, Colab proved to be an accessible and user-friendly option for deployment.
Finally, it all concluded by leveraging FastAPI's simplicity and Colab's deployment capabilities, and creating a reliable tool to distinguish legitimate URLs from fake ones!


